Still Getting Difficulty Formatting Excel Files! Here’s The Solution

Have you had enough of messy, puzzling spreadsheets? Do you spend hours modifying and adjusting borders and fonts just to have a document that is still difficult to read? You’re not alone. Excel formatting errors are a typical cause of annoyance, but they don’t have to be. This post covers basic formatting issues and offers effective solutions that turn your spreadsheets from tedious to handy.
Key Sections:
-
Cell Formatting’s Power
The readability and understanding of your data is determined by the cell formatting.
- Merging Cell vs. Center Across Selection
Disturbance may occur while sorting and using formulas while cell merging. “Center Across Selection” keeps the cell structure by visually centering the text without combining the cell. For instance: Your title crosses many columns. “Center Across Selection” provides a simple way to filter and sort the data under the title by centering it without merging with the cells above it.
How to use Center Across Selection:
- Select the range of cells.
- Go to Format Cells (Ctrl + 1) > Alignment.
- Under Horizontal Alignment, choose Center Across Selection.
- Click OK.
- Click here for more.
- Automatic Borders
Dynamic borders adapt as you add or remove data.
How to apply Automatic Border:
- Select your data range.
- Go to Home > Conditional Formatting.
- Select New Rules from the drop-down.
- Select “Use a formula to determine which cells to format” from Rule Type.
- Type the formula =NOT(ISBLANK($A2)) (assume your data is in column A2)
- Press F4 twice.
- Click on the format next to the formula box.
- Click on the border and select the border type, and click on Outline.
- Finally, hit OK!
- Click here for more.
-
Conditional Formatting: Data Visualization
Conditional formatting highlights data based on criteria, revealing trends and outliers at a glance.
- Highlight Blank Cells:
Identify missing data quickly.
How to highlight blank cells:
- Select your range
- Go to Home > Conditional Formatting > Highlight Cells Rules > More Rules. Choose “Format only blank cells”.
- Click here for more.
- Highlight Like a Pro:
Use formulas for complex conditions.
How to highlight the data:
- Select your range.
- Go to Home > Conditional Formatting > New Rule.
- Choose “Use a formula to determine which cells to format.”
- Type the formula: =$E$2=$A1 (assume that $E$2 is the search value, and $A1 is the beginning of the data). (You can make a drop-down menu for the search value.)
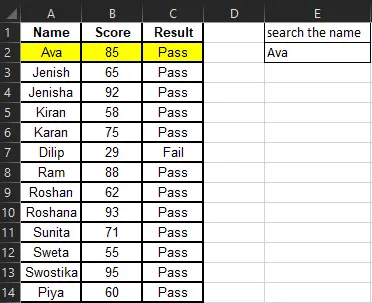
- Choose the color from the format. And finally, hit OK!
- The data will be highlighted as you change the items in the drop-down menu.
- Click here for more.
- Highlight and Delete Duplicates:
Duplicate entries can cause inaccuracies in reports.
How to highlight duplicate entries:
- Select the dataset.
- Go to Conditional Formatting > Highlight Cells Rules > Duplicate Values.
- Choose a color and click OK.
- Click here for more.
How to delete duplicate entries:
- Select your data.
- Go to Data > Remove Duplicates.
- Check the columns to scan for duplicates.
- Click OK.
-
Row & Column Formatting: The Art of Spreadsheet Organization
Proper row and column formatting ensures easy navigation and data organization.
- Autofitting Rows and Columns:
A simple but effective function that provides readability and an attractive presentation for your worksheets is autofitting rows and columns, which automatically adjusts rows and columns to precisely match their content.
How to auto-fit the width rows and columns:
- Press Alt + F11 to open the VBA Editor.
- Click Insert > Module to create a new module.
- Type the VBA Code.

- Click for here more information.
- Freezing Panes:
Freeze Panes is a simple yet incredibly useful feature that can significantly improve your experience working with large spreadsheets.
How to freeze top row:
- Go to View Tab > Freeze Panes
- Click on Freeze Top Row. It will freeze the very first row of the data range.
- Click here for more.
How to freeze panes:
- Select the row/column below/next to the one you want to freeze.
- Go to View > Freeze Panes > Freeze Panes.
- Show/Hide Columns:
Hiding unnecessary columns can declutter your spreadsheet. It’s a simple technique that can make a big difference in your spreadsheet workflow.
How to hide columns:
- Select the columns.
- Right-click a column header and select “Hide.” OR,
- Press Ctrl + 0.
How to show columns:
- Select adjacent columns.
- Right-click a column header and select “Unhide”. OR,
- Press Ctrl + Shift + 0.
-
Customize Number Formats
One versatile method that provides you complete control over the appearance of your numerical data is custom number formatting. Numbers can be displayed as dates, percentages, currency, or with certain decimal places.
How to customize the formatting of numbers:
- Choose the cell or range of cells.
- With a right-click, select “Format Cells.” Alternatively, hit Ctrl + 1.
- Under the “Number Tab,” choose the Category. (#,##0.00) for numbers with two decimal places and commas as separators is an example of a code that may be used to build custom formats.
-
Data Entry Formatting Tools
By leveraging data entry formatting tools, you can transform your data entry process from a tedious chore into a smooth and efficient operation.
- Text-to-Columns:
It splits data in one column into multiple columns.
How to split the data into multiple columns:
- Select your data.
- Go to Data > Text to Columns.
- Choose the delimiter (e.g., comma, space). Choose Fixed Width if the data follows a structured format.
- Click Next, set your delimiters or column widths, then click Finish.
- Click here for more.
- Including Units in Sums:
Directly including units within cells used for calculations can create significant problems. This section explores how to visually display units while emphasizing the crucial distinction between visual presentation and accurate calculations.
How to calculate including Units:
- Click here for more details.
-
Excel Printing Options:
Printing Options allow you to control how your spreadsheets are printed.
- Printing Headers on Every Page:
When printing multi-page spreadsheets, one of the most frustrating experiences is realizing that your column headers (or row labels) are only printed on the first page.
How to print headers on the every page:
- Go to Page Layout > Print Titles
- Select Rows to repeat at top.
- Click OK.
- Click here for more.
- Printing Only Selected Data:
Printing the entire sheet can be wasteful, overwhelming for the reader, and may include sensitive information you don’t want to share. Excel’s “Print Selection” feature allows you to precisely choose which parts of your spreadsheet are printed.
How to print the desired data only:
- Select the data you want to print.
- Go to File > Print, and under “Settings,” choose “Print Selection.”
- Click here for more.
Conclusion:
By mastering these techniques, you’ll transform your Excel spreadsheets into powerful tools for data analysis, communication, and informed decision-making. Experiment with these features, and you’ll soon be creating professional-grade spreadsheets that impress and inform.